Let’s get the bad news out of the way first. My engine had previously been rebuilt by a reputable firm to solve the “common” bore scoring issue seen by a small proportion of 3.8 litre M97.01 engines. Fast forward a few years, and I start getting exhaust gases into the coolant expansion tank. Nothing really drastic, not even using coolant! Clearly, the head gasket needed some attention, but it didn’t appear to be a life-and-death situation.
I went about removing the engine, which only took me a few hours. I have never done this on a 911, but removed plenty of engines from cars in the past. Once I had the engine and gearbox out, I set about removing the gearbox and getting my engine onto my engine stand, so I could start the disassembly and inspection in accordance with the Porsche workshop manual.
A 911 has a crank case that splits in half – like a Subaru – with a special crankshaft carrier these halves bolt into. As such, I split the crankcase so I could perform the inspection of components.
The first sign of a Friday rebuild came when I discovered a crack in the IMS chain tensioner housing. This made me think someone has used the “ugga dugga gun” to fit the IMS chain tensioner at some point, whether an indie specialist or the firm that rebuilt the engine. Sure enough, when I removed the old tensioner, a portion of the case split off, and the threads looked a bit mangled.
Being familiar with repairing cast aluminium in the form of repairing Rover V8 components and even modifying Rover V8 heads, I took to the process of slowly repairing the crack in the engine block. This involved lots of welding, grinding, welding again, and grinding again, to get a strong repair.
The process involves TIG welding, which is a tricky process with aluminium. Heat always needs to be managed very carefully. However, with the right approach, it will result in a strong repair that is resistant to cracking. Part of this comes to selecting the right filler material. I selected 4047, as this has a higher silicon content, which helps resist cracking. It is also very similar to the alloy used to make the engine block, which is a high-silicon alloy. Oddly enough, it is not dissimilar to the alloy used by some components of a Rover V8.
The welding had been finished by this stage. However, due to how much welding needed to be performed to ensure a strong repair, the face and bore need to be machined. This will be performed by the machine shop I use. I will also fit a TimeSert to create a stronger set of threads than the original threads, given that it seems whoever did the overtightening of the IMS tensioner also managed to cross some of the threads. TimeSerts should not be confused with helicoils, which are not as strong in high-torque applications.
Clearly, we have learned that an apprentice on a Friday had to get the tensioner back in before going out on the town.
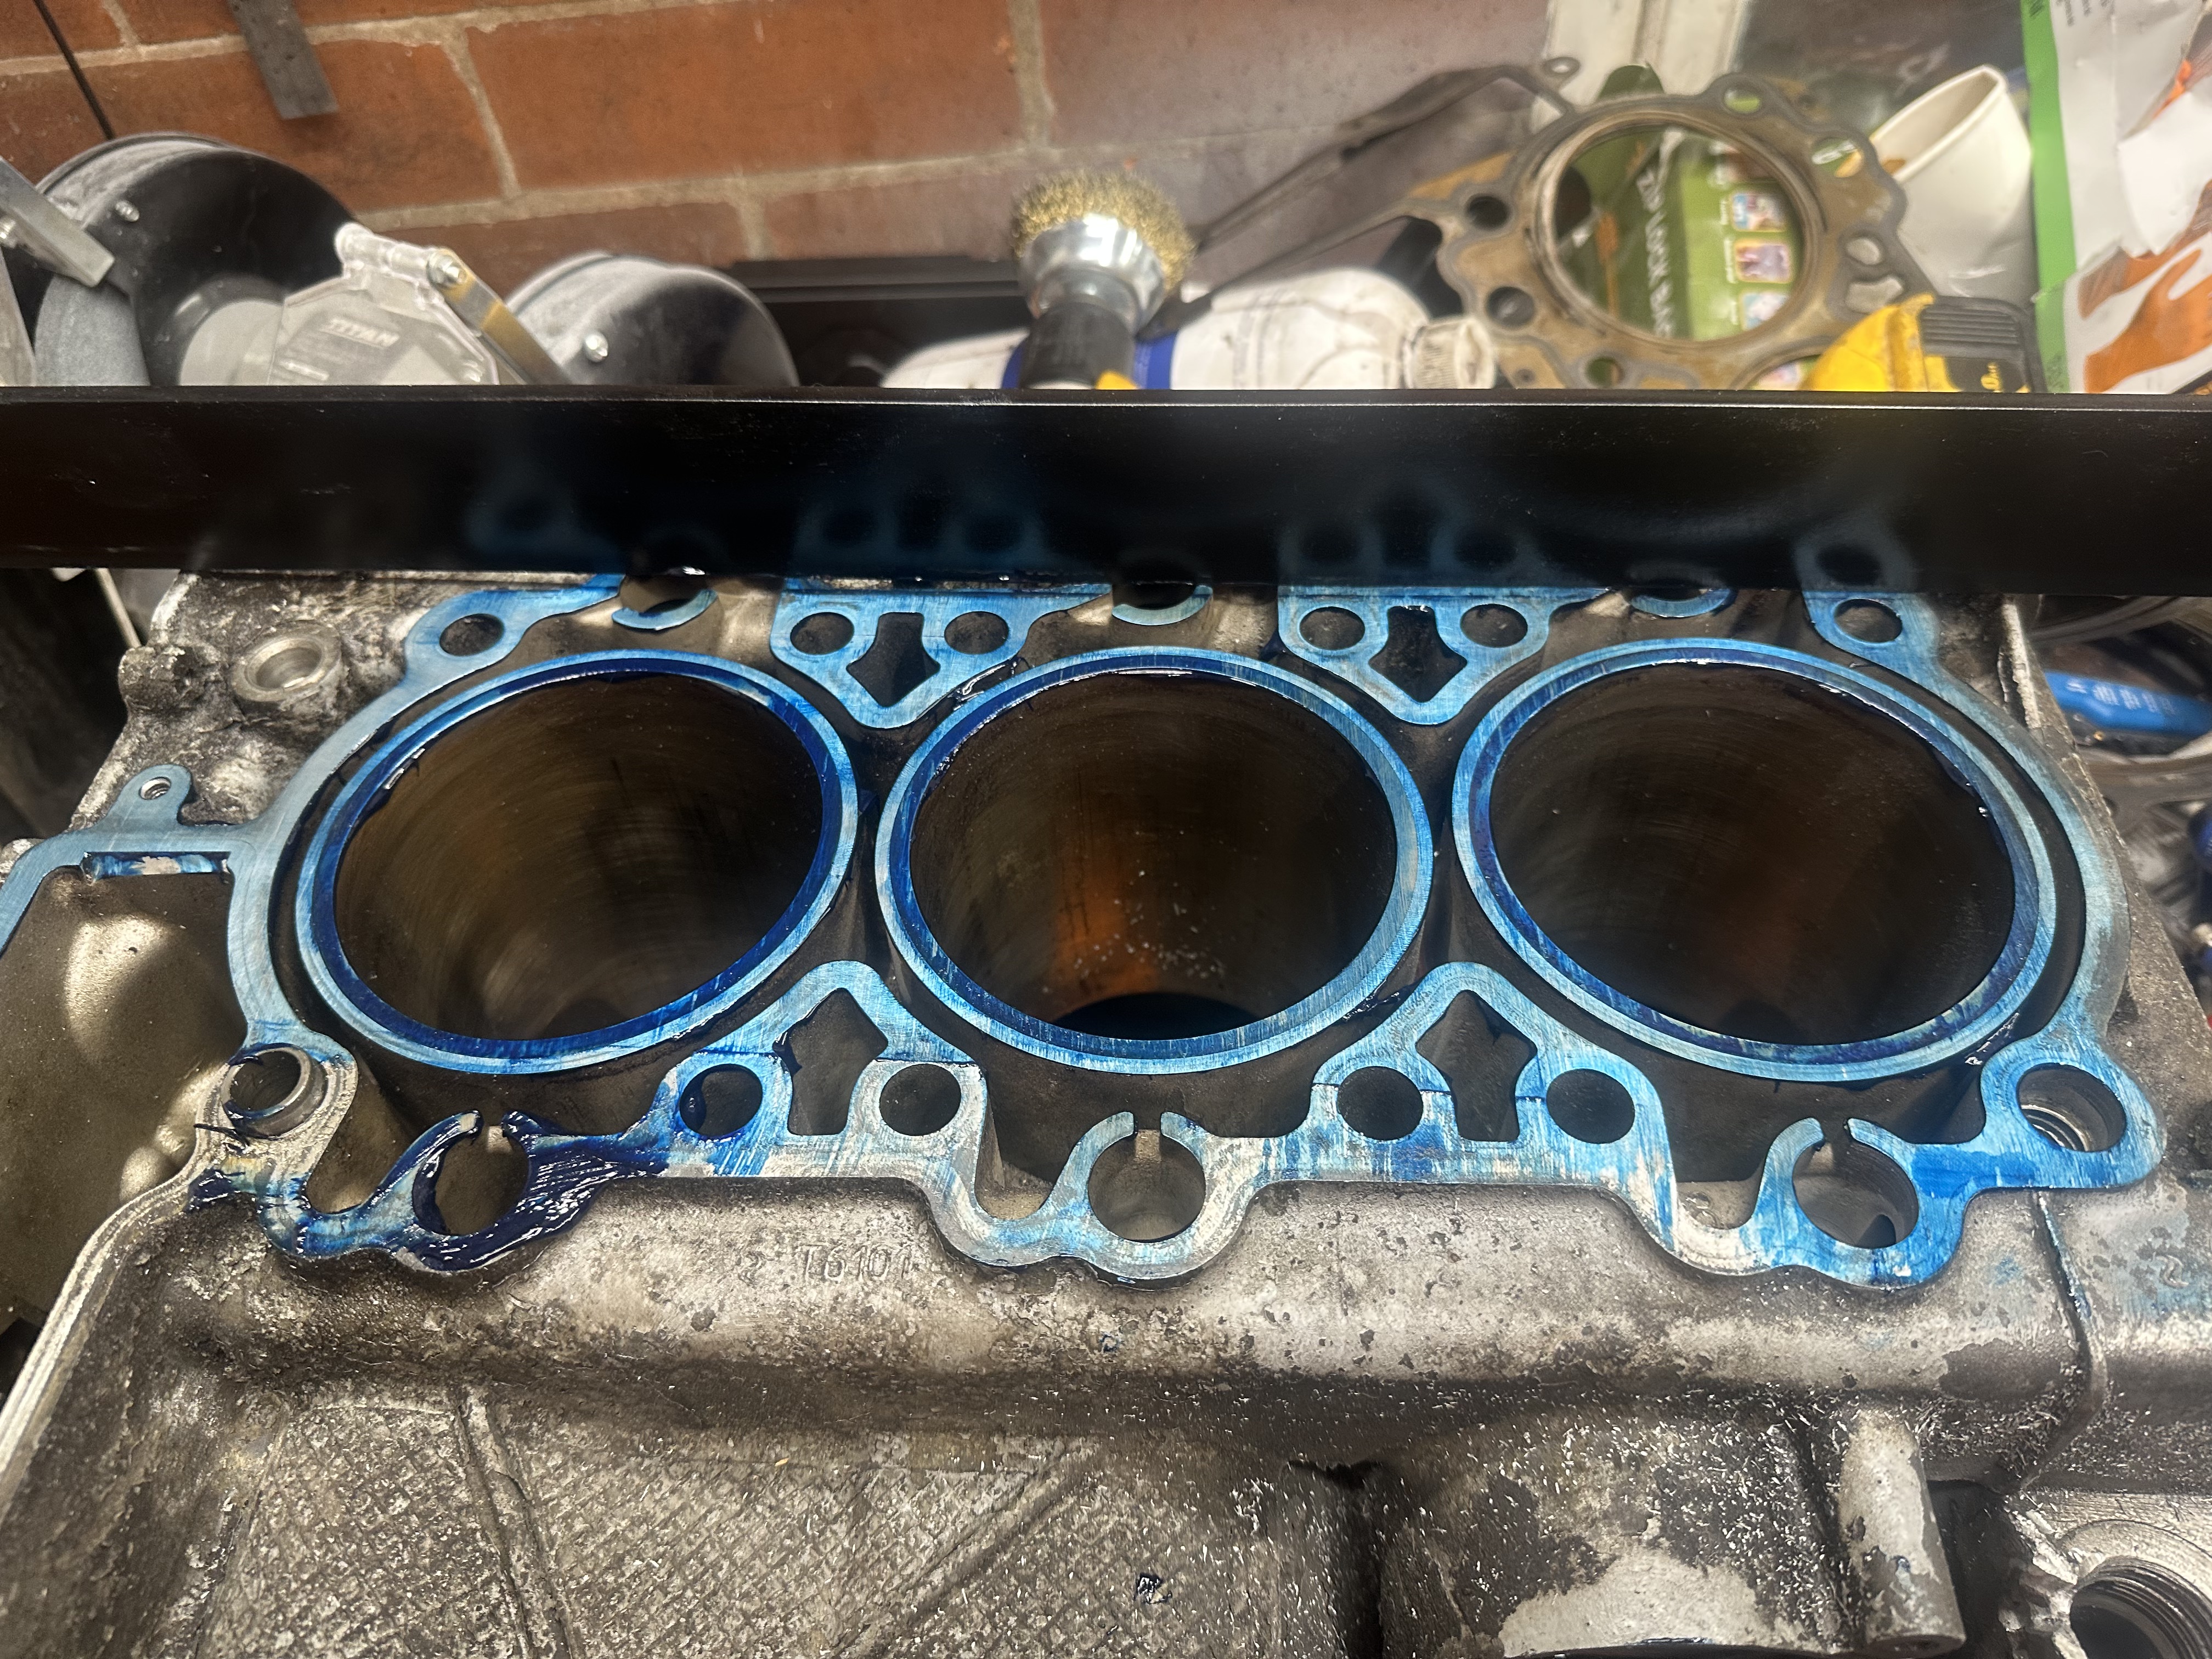
That’s the easy part out of the way. Now for the not-so-helpful discovery. Part of the process of rebuilding involves measuring different parts of the engine to ensure they are within Porsche’s tolerances. This includes cylinder bore roundness/ovality, deck flatness, cylinder head flatness, surface roughness, runout of rotating components, end float of shafts, etc. By this point, having done a visual inspection of the old head gaskets, I found that cylinder 6 had a minor breach of the seal ring. I was quite surprised it was only a minor breach of the seal ring; however, I could see evidence of gasket chafing. This is where the gasket is being rubbed away by the movement of either the cylinder head or the deck of the engine block.
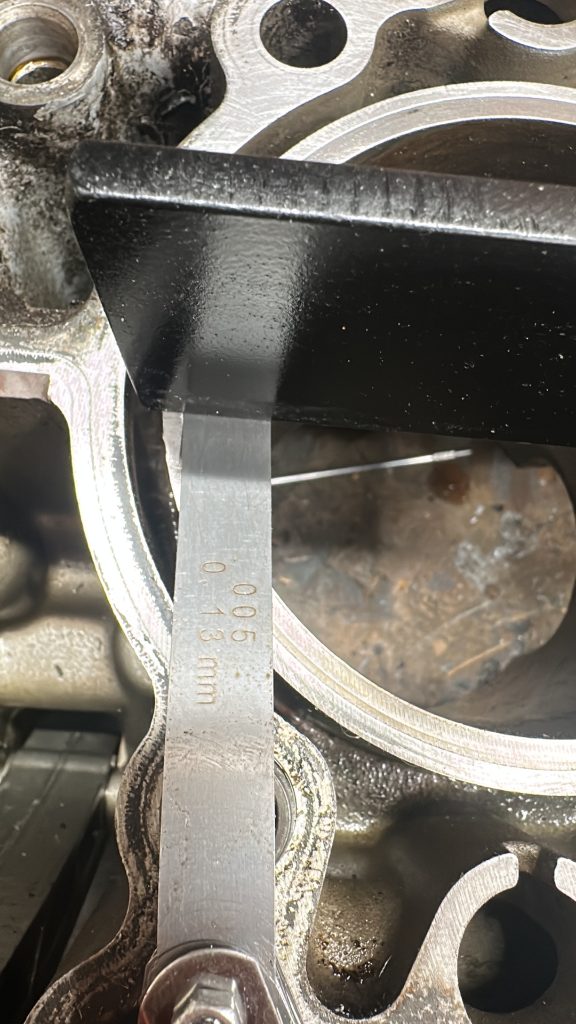
So I got my engineer’s straight edge and feeler gauges out to measure the flatness. I was quite perturbed when I measured the cylinder-to-cylinder runout to be almost flat (less than 1 thousandth of an inch or <0.001″ – within tolerance), and the entire head surface to be within two thousandths of an inch or <0.002″). I was expecting to see some cylinder head warpage.
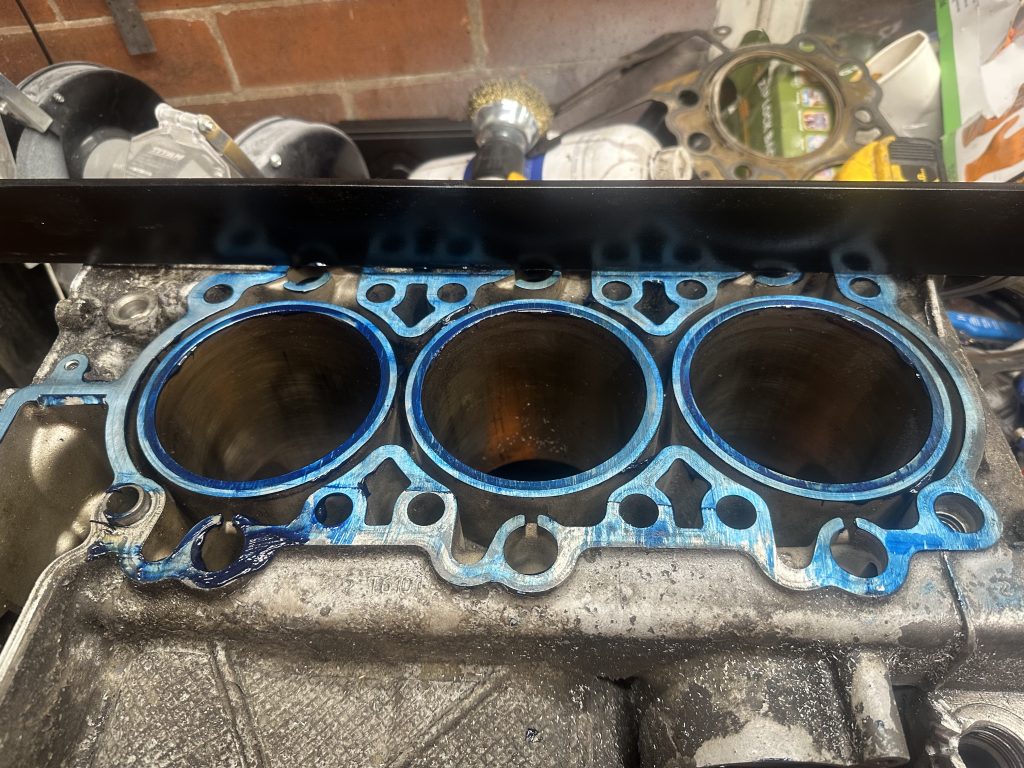
I then measure the deck and notice all the cylinder liners on bank 2 have started dropping. Cylinder 6 measured the lowest at 0.005″, which explains why it was chafing the gasket. When the cylinder is cold, it will have been causing vibration with the gasket until the engine warms up. I double checked the engine had top hat liners, which it did. Top hat liners have a special groove or flange that you machine into the bore during installation, so it fits the cylinder perfectly, even if thermal expansion occurs. This means it is impossible to slip, unless the counter-bore has been machined incorrectly into the cylinder. This leaves me with my current suspicion that the liners have always been a ticking time bomb in this engine, as they were never installed correctly.
My plan now is to wait until my pack of Time Serts arrives from the US so I can send the crank cases to my machinist. The machinist will be inspecting the installation of the liners. This is done by warming up the block and measuring to see if the liners drop any more. If they don’t drop drastically, then it is realistic that the problem can be solved by skimming the deck of the block and compensating for the height with a cometic head gasket. If they do, then I will have to get some oversized liners fitted, which is costlier.
Going through another kind of liner repair is a bit bitter, so perhaps I should talk about the rebuild plans I have to not feel bitter about the car.
Having done some research, including speaking with some folks who compete Porsche 911s and Caymans, I have decided to offset the dismay by rebuilding my engine as a 3.9 with some X51-inspired modifications. Really, these are modifications that will increase power and torque, using the same techniques from making power out of Rover V8s.
I’ve picked some Mahle Motorsport forged pistons, suitable for ductile iron liners. These will increase the bore size to deliver a 3.9 litre engine. It will also bump the compression ratio slightly from 11.8:1 to 12:1, even with a cometic gasket, so I should naturally see a small torque increase too.
Next, I’ll be porting and polishing the cylinder heads. By themselves, these don’t add power in a standard Carrera S. However, they will enhance the effect of any air intake or exhaust modifications. At the same time, I will be replacing the valve seats and guides, as it makes sense to consider these wear items. As part of the valve seat replacement, I will be getting the seats 3 or 5 angle cut, which helps prevent the reduction in velocity of the air/fuel mixture entering the combustion chamber. All tricks I’ve used on V8s before – nothing new here.
For exhaust, I already have a set of stainless steel manifolds that flow better than the original Porsche items and a stainless steel exhaust system that replaced the original system when it was falling to bits. Besides the flow benefits, the stainless steel system is only 14KG, compared with the OEM system at 28KG! I am still planning on keeping the original cats in place, as I suspect sports cats will make it louder than I’d like. I’ll let the dyno re-educate me if needs be.
For the intake, I am planning on running an IPD plenum with a GT3 throttle body. Ordinarily, these don’t add power by themselves, as Porsche had done a reasonable job of balancing the OEM intake and exhaust from the factory. However, like the fire triangle, if I can get rid of more gas, I can consume more gas too, generally speaking, in my case.
I haven’t yet completely answered the question of air induction. An X51 intake is prohibitively expensive, hence going down the IPD route. However, we can learn that it has an additional cutout in the engine compartment lid, and a second air intake bellows, to get even more cold air than the standard intake. It is likely that for now, I will run the standard Carrera S intake with a silicon hose into the IPD plenum setup. My inner engineer thinks it is possible to add that second engine decklid cutout and make a custom plenum out of fibreglass, that leverages a generic motorsport panel filter. From memory, a TVR Cerbera panel filter may be about the right size for an X51 intake. I could also explore the additional cutout and make some more baffling to use the Fabspeed carbon fibre intake, although a lot of speculation from differing dyno results means that it may be a gamble over the OEM intake.
I haven’t mentioned camshafts. I think the right thing to do here is to use the standard camshafts, as it is effectively a “fast road plus” engine build. Perhaps a tuner can map the valve timing and lift profile further to take advantage of the kit I am putting on.
At least in this bad news, there is some good news. Playing the game of seeing how close to 400BHP we can get in a naturally aspirated Carrera S is a fun exercise, and not really costly once the engine is in bits. They are a rewarding driving experience as they are, so I’m not going crazy (in my perspective) on trying to make it fast. I am building a 5.5L TVR if I want to go fast and scare myself!